
Quality pens and pencils don’t come cheap, and some of them can become our favorites to write with. Unfortunately, having them taken—whether accidentally or not—by others is not pleasant. In this tutorial, “School Supplies: Customize and Protect Your Pens and Pencils,” you’ll discover creative ways to personalize and protect your favorite writing tools, ensuring that they stand out and won’t be mistaken for anyone else’s. By making them unique, no one will have the same ones, and they’re less likely to be claimed by others.
Let’s dive into some fun ways to create customized school supplies that you can enjoy every day! The best part is that you can do most of these projects with items you probably already have at home.
School Supplies: Customize and Protect Your Pens and Pencils – Transparent Pens

Some pens have a transparent barrel that reveals the ink cartridge. These pens are often designed to be unscrewed so the ink container can be removed. Here are some quick ideas to customize these transparent pens:
1. Nail Polish
Materials:
- Transparent pens (with removable ink container)
- Nail polish (in desired colors)
- Painter’s tape or masking tape
- Paper egg carton or sponge (to hold the ink container while drying)
Instructions:
- Remove the ink container from the pen.
- Use your favorite nail polish to paint the ink container or create a design. For neat edges, use painter’s tape or masking tape to define borders before painting.
- Let the container dry thoroughly in an upright position. You can poke holes in a paper egg carton or use a sponge to hold it steady while drying. Make sure the balance is secure before you start painting.
2. Sharpies/Posca Markers
Materials:
- Transparent pens (with removable ink container)
- Permanent markers (such as Sharpies or Posca markers)
- Rubbing alcohol in a spray bottle
- Protective surface for drying the pen
Instructions:
- Use permanent markers to draw abstract designs or patterns on the ink container.
- Lightly spray a fine mist of alcohol over the design to blend the colors, and then let it dry completely. Be careful not to oversaturate the surface.
3. Paper Name Tags
Materials:
- Transparent pens (with removable ink container)
- Plain paper (small pieces)
- Double-sided tape
- Scissors (to trim paper)
Instructions:
- Write your name on a small piece of plain paper, ensuring it’s small enough to wrap around the ink container. You can use a line from a notebook page, trimming off the margins to keep it neat.
- Apply double-sided tape to the back of the paper and attach it to the container for a personalized touch.
School Supplies: Customize and Protect Your Pens and Pencils – Non-Transparent Pens
For non-transparent pens, customizations will need to be made on the exterior. One fun option is creating small holes to attach decorative elements. This method takes a little more time, but the results are worth it and can be a fun project to share with kids and friends.
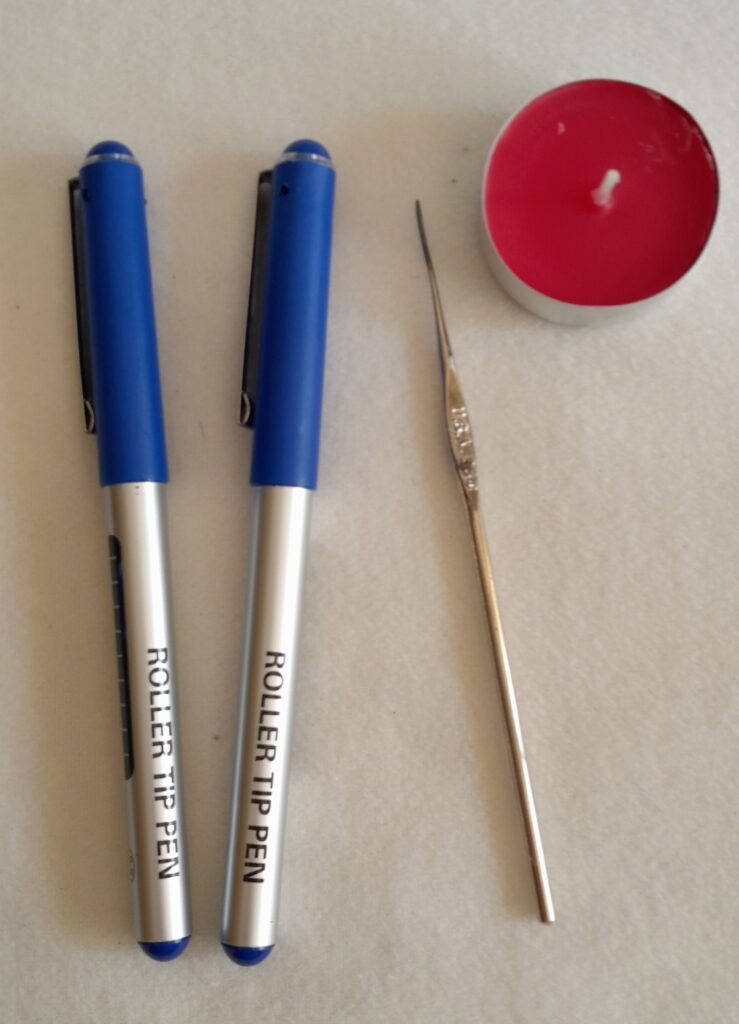
How to Create Holes in Non-Transparent Pens
Materials:
- Non-transparent plastic pens
- Tapestry needle, thin knitting needle, awl, or lace crochet hook (without the hook)
- Candle or lighter (for heating)
- Well-ventilated workspace
Instructions:
- Ensure the pen is made of plastic or a material soft enough for this technique.
- Heat a tapestry needle, thin knitting needle, or an awl using the flame of a candle. Be sure to work in a well-ventilated area, as burning plastic can release harmful fumes. My preferred tool is a lace crochet hook without the hook.
- Once heated, insert the needle through the pen at the desired spot, ensuring it goes all the way through to the other side.
- Repeat the process on the opposite side to make sure both holes are evenly opened.
Caution
Always work in a well-ventilated area when heating needles, as burning plastic can release harmful fumes. Handle hot tools carefully to avoid burns, and make sure the pen material is safe to pierce.
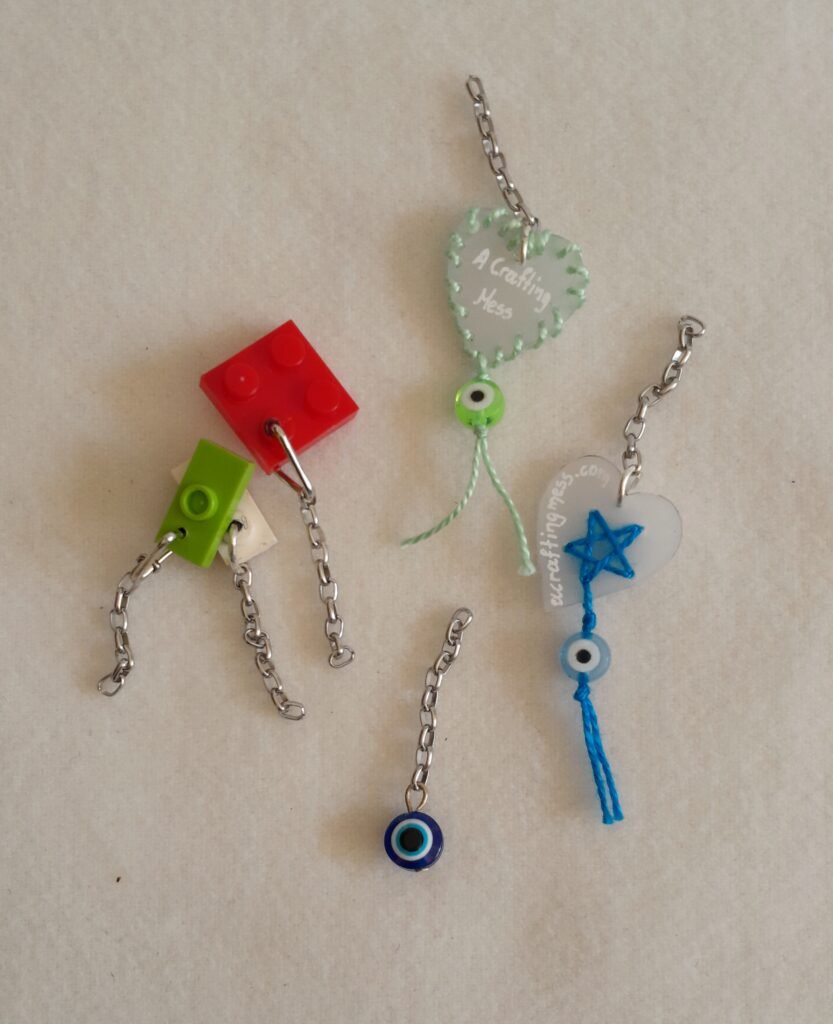
Decorating Non-Transparent Pens
Materials:
- Miniature plastic toys, beads, or shrink plastic designs (for decoration)
- Iron headpins
- Jewelry pliers
- Jump rings and small chains
- Decorative thread (alternatively)
- Beads or small bells (optional)
- Instructions:
- Use miniature plastic toys, beads, or shrink plastic designs to create decorations.
- If necessary, create a small hole in the decoration using the same heated needle technique.
- Thread an iron headpin through the holes in the pen, then use jewelry pliers to form a loop. Do not close the loop yet.
- Attach a small piece of chain to the decoration using a jump ring. Attach the other end of the chain to the loop on the headpin. Close the loop securely.
Alternatively, You Can Use Decorative Thread
Instructions:
- Cut a piece of decorative thread about 14 cm (5.5 inches) long.
- Thread the string through both holes and tie a knot—leaving the ends uneven for a creative look.
- Thread your decoration onto one end of the string. Tie a double knot near the end and trim the excess.
- On the other end, add a bead or a small bell. Secure it with a double knot at your desired length, and trim any excess thread

School Supplies: Customize and Protect Your Pens and Pencils – Pencils and Coloring Pencils

Here are some easy ways to personalize your pencils and coloring pencils:
1. Marker Decoration
Materials:
- Pencils or coloring pencils
- Markers or nail polish (in desired colors)
Instructions:
- Use markers or nail polish to paint the wooden surface near the end of the pencil, adding a pop of color.
2. Carving
Materials:
- Pencils or coloring pencils
- Sharp craft knife or precision knife
- Watercolors, acrylic paint, or markers
- Paper towels or cloth (to wipe excess paint)
Instructions:
- Use a sharp craft knife or precision knife to remove the varnish and carve something simple, such as a letter, geometric shape, or lines.
- Apply watercolor, acrylic paint, or markers to the carved area. Allow a few minutes for the color to dry on the wood, then gently wipe off any excess. Your carving will now stand out.
3. Adding Decorations
Materials:
- Pencils or coloring pencils
- Sharp tool (needle or awl)
- Miniature plastic toys, beads, or shrink plastic designs (for decoration)
- Thread or small chain
- Needle (to help thread decorations if needed)

Instructions:
- Gently use the awl to make a hole all the way through the pencil in the place where you want to attach the decoration. Be cautious not to apply too much force too quickly, as it could split the pencil.
- Thread through your chosen decorations as described in the non-transparent pen section. If necessary, use a needle to help guide the thread through the hole.
Conclusion to School Supplies: Customize and Protect Your Pens and Pencils

There you have it—plenty of creative ways to customize and protect your pens and pencils! Whether you go for quick and easy methods or more intricate designs, you’ll end up with beautiful, personalized stationery. These ideas also make wonderful back-to-school gifts for kids—imagine using shrink plastic to create personalized name tags for their pencils! (By the way, if you are new to shrink plastic, there will be tutorials coming up with great ideas and tips to use this versatile material). Get creative and transform your everyday school supplies into something truly unique!
I look forward to hearing your comments and any other tips you’ve discovered to turn everyday stationery into exceptional pieces!